Weekend Project with Annie Sloan Chalk Paint
The bank holiday weekend is almost upon us. If you feel like expressing your creativity and getting bold with colour, a weekend paint project could be just the thing to scratch that creative itch. And if you’ve ever wondered how easy it is to use Annie Sloan Chalk Paint then read on.
Weekend Project – Ercol Chair

This easy weekend project is great for beginners; it took me a total of 4 hours on the Saturday and another hour on the Sunday to complete. In that time I gave my tired looking Ercol chair a total revamp with new bolder colours which now work so much better in my home.
One of the things I love most about Chalk Paint (aside from the beautiful selection of colours that give you endless creative options) is just how easy it is to use. Chalk Paint has been designed to work on most surfaces without sanding, priming or prior preparation. This means you really can get stuck straight into your project. It works on wood, glass, walls, furniture, metal, laminate, concrete, indoors, outdoors and even fabric.

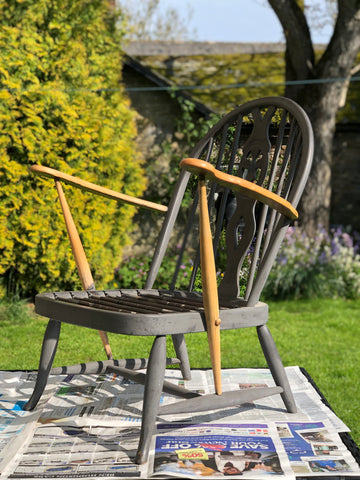
The chair I’ve used (above) is one I have had for a while. It was painted grey to fit in with my previous decor. I had previously sanded down the arms to the bare wood as I love how the arms of this chair feel. If you want to reveal any wood on your project you will of course need to add this preparation to your overall project time.
How I did it
You will need:
- 1 x chair of choice
- Paint brush (one for each colour)
- Choice of Chalk Paint – I chose Olive + Barcelona Orange. I had 1ltr tins as I will be using these colours elsewhere around my home.
- Clear wax + wax brush. Personally I would only use the wax brush as I find it the easiest way of applying the wax. I have tried with a cloth and it didn’t work for me. But test an inconspicuous area first if you are unsure.
The weather was lovely last weekend so I took my chair outside. I worked on the garden table which also meant I didn’t have to bend down/stoop too much.
1. First I gave my chair a good clean with a damp cloth

2. Start painting the underside of your chair in your chosen colour


3. Flip your chair over and paint the top side


4. Allow 1-2 hours to dry before applying a second coat paint.
5. After 2 hours you can add you first coat of wax


6. Leave overnight for the wax to cure
7. Apply second coat of wax on day 2 and buff with a lint free cloth.

My tips:
1. Don’t be afraid of the paint or the wax; apply in long broad strokes rather than gingerly dabbing the paint.
2. Starting painting the underneath or the back of your chosen piece first so you can get a feel for the paint.
Ta-dah...here is my finished chair in-situ

Fun in the sun with paint, listening to the birds singing - what a lovely way to spend a few creative hours, AND the result is a chair that now really harmonises with my decor.
Whose up for a weekend paint project this weekend?
Sharon
BOOK A FREE COLOUR + DESIGN CONSULTATION
If you would like help with a project or just want to chat through ideas for your home you can book a free 30 minute colour and design consultancy with Sharon (aka A Story of Home, our resident interior designer). Just email the shop at info@hestascene.com to book your consultation
